Pixelation Lesson 1 - Grass
by Sew
We'll usually be working with MS paint, so to make sure all the colors you use will look the same inside the ohr, you should use the ohr's palettet.

Copy and paste it to wherever you're working and pick colors that way. (It isn't really all that necessary to do this in MSPaint. I just wouldn't reccomend trying to do pixel work in Paint Shop Pro or Photoshop.)
We're going to start with something very common in games; grass.
I start out by choosing a range of green colors to work with. However, just because I've selected 10 colors doesn't mean I'm going to use all of them. Most grass tiles will use about 3 colors: a base color, a tint (lighter), and a shade (darker) of that base.

So let's start by choosing our base color.

Now, before we go on, let me just say that I am not a fan of the airbrush tool and you will very rarely see me use it. The reason for this is that when something is airbrushed, it destroys the texture of the tile unless done correctly, which is very hard to pull off. It's also not a good way to learn how to create things, and more than 90% of the time it will look really ugly. (and the other 10% doesn't look all that hot either)
After you have a base color, you should decide what style or type of grass you are going to make. We're going to make green grass (obvious at this point) and we want the player to be able to see each individual blade of grass, to give it a feeling of depth, as though it's been uncut. Yet, our grass is still going to be rather thin.
I'll start by drawing blades of grass on the on the tile. My 'blades' seem to resemble a knights-move in chess, but are a little more exaggerated. It's also importaint to leave some room on each side your tile blank. I reccomend drawing your blades a 16x16 or area.

The reason behind leaving a gap at each side is so you can make sure to eliminate the grid. Now you can try and fill in the sides but make SURE that if one of your blades starts to go over the edge of the tile that its carried on over the opposite edge. ie, a blade coming up to the top edge would need to be finished on the bottom edge, like so:

I've highlighted a few of the blades that carry over in red to make them more visible.)
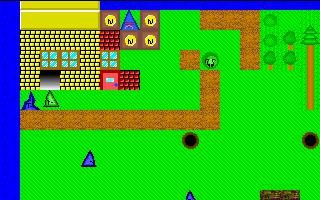
After you've checked to make sure that all four edges of the tile line up right, copy and paste the tile a few times to see how it will look in-game.

Looking at that tile you can't seem to see any form of the grid. If for some reason you can see some repetition in your grass, you may have too many grass blades in one spot, or not enough in another. Identifying where the problem is, is the first step to fixing it.